I now have two Core Strength Balls, one I purchased last month and one my daughter Lauren had gotten me for Christmas. I thought I would use one for sitting as they claim this is better than using a chair and it tightens your abs, etc.,. I went to sit on it and it rolled out from under me, I almost smashed my chin on the desk. I guess I will have to use it while wearing a helmet and face guard. Just call me Grace.
I can't believe Christmas has come and gone and we are now in to the new year. I am pretty well blessed in my life with a wonderful family and friends. I take all of my friendships very seriously, friends are my blessings. For the most part I have been healthy with the exception of the Fibromyalgia, Chronic Lyme and Reynaud's. I also had a good run with surgeries two years ago, 5-Kidney Stones surgeries all in one month and one Gall Bladder removal six months later. As they say "This Too Shall Pass." I don't make New Year's Resolutions because I honestly don't believe that making a promise to yourself once a year on a special day will make you follow through. You either do it or you don't.
Last year I joined a Boot Camp Class as many of you may or may not know? It has been one of the toughest and most rewarding challenges I have put upon myself. Each day my body gets stronger and faster. I see a great improvement with the flare-ups that I get with the Lyme and Fibro. Not to say I am completely pain free, but the swelling, insomnia, fatigue, headaches, mobility, etc., has been so much better with intense exercise. I finally took 1-hour in the morning 3-days a week and 1-hr in the evenings 2-days a week just for me. I actually felt guilty for doing this. Why? Because I am a Mom, Gramma, Wife, Friend and care for a houseful of animals. I know it sounds odd, but that was my original way of thinking. Family and everything else first and then me at the bottom of the totem pole. Sometimes we Type A Personalities who want everything just perfect need to take some "Me Time." It's not being selfish, it's deserved. I shut my mobile phone off when I am attending my classes, if there is a true emergency people know where I am. Being in a class with like minded, health conscious ladies that know how to push their bodies to the limits and encourage each other and have fun while doing so, has been an eye opening experience for me. Who knew being in pain, sweating and looking like a drowned rat at times could be so much fun. I have had other friends read my posts on Facebook and can't imagine doing what I do. Well imagine it, because if I can do it so can you.
Admittedly there are some days I have to drag myself to class because I might be in a flare-up and just don't feel well. Once I get there and do the initial stretching, socializing with the ladies and then jump right in to HIIT (High-Intensity Interval Training) I start to feel better. The more my Personal Trainer pushes me, the better I feel mentally, physically and emotionally. We all joke around about doing Burpees, I don't think there is one person that I know that actually enjoys doing them. I started off struggling to do one, now I can do 20 in a minute, not too bad. If you have a good group and a good Personal Trainer then the rest will come. He is always setting goals for us, he never yells and has never been judgmental. He is always happy to modify if you truly are struggling or can't physically do a work out. Being extremely competitive, I try to meet or exceed each goal set upon me. There is no better feeling than accomplishment.
I am hoping this year will be an amazing one. I will be travelling to Ireland in June to meet friends and to do research on my family history. I can't wait to see where my family hails from. My dream is to purchase a thatch roof cottage with property and possibly live there under a dual-citizenship. I however will never give up my citizenship here, I love and would die for my country. A smaller house in my eyes will be less to clean and maintain, freeing up my time to do as I please. I am a woman that loves simplicity and a life without complication. I am not materialistic and never will be. "Inanimate Objects" can't be taken with you when you die, so why stock pile them while you are here, or have others inherit them? I would rather spend my money on making memories travelling and doing activities with my family, at least that is my way of thinking. My kids joke about how after I am gone they are going to donate all of my worldly possessions to charity and will be keeping all of my money. I joke back and tell them "There is no money, so good luck to you there." (Wink). Objects don't mean a thing to me, I can live with them or without them. What does mean a lot to me are my family, friends and my animals that I rescue, rehabilitate, adopt and foster. Life is what you make it. I try to live mine to the fullest and I also try to be the best human being that I can be. Happy New Year everyone. May you all have peace, love, happiness and health. Cheers!
*Note: I have no idea why all of my text is hi-lighted, it must be a glitch. My apologies for this I am not sure how to fix it. I have re-written this twice.*
Tuesday, January 5, 2016

Buckeyes
My family loves these I try to make them especially at Christmas time. I always use all-natural ingredients, but whatever you have on hand is fine.
Ingredients:
*1-Pound, 16-Ounces of Confectioners Sugar AKA: Powdered Sugar (3 1/2-Cups)*
*1-Pkg Graham Crackers (3-Cups)*
*2-Sticks Butter Softened (1-Cup)*
*1-Teaspoon Pure Vanilla Extract*
*1-Cup Peanut Butter*
Ingredients to be used in the last step:
1-12 Oz bag of good quality Chocolate Chips
1/2 Bar of Food Grade Wax
What You Will Need:
Mixing bowl
Double-Boiler or use 2-Pans one smaller than the other
Small Ice Cream Scoop or a Tablespoon
Two baking sheets. One for the refrigerator and one for putting the finished Buckeyes on.
Tooth Picks
Wax Paper
Parchment Paper
Crush the Graham Crackers turning them in to crumbs. I find putting them in to a Ziplock plastic bag, closing the bag, laying the bag on a flat work surface, then using a rolling pin over the closed bag repeatedly works well. Make sure there are no large pieces. They should look like grains of sand. A food processor works well too. I have used both.
Blend all of the above 5-ingredients with the * into a mixing bowl. You can do this by hand with a wooden spoon or with a stand mixer. I use my KitchenAid for everything, I love it. Use the Paddle Attachment. Mix well.

Take the Peanut Butter mixture and roll into 1-inch balls. I use a small Ice Cream Scoop, this makes all of the balls the same size. If you don't have one, just use a Tablespoon to scoop out the mixture.
After you roll each ball, put it on the Parchment lined baking sheet. Repeat this process until there is no more mixture left inside of the bowl. How many balls you get depends on if you use a scoop or tablespoon. Put the baking sheet with your balls in to the refrigerator over night.

After the balls have set up over night in the refrigerator, take them out and put on a flat work surface.
*How to make a Double-Boiler*
Place the larger pan on your stove top. Fill the pan halfway with water. Take the smaller pan and put on top of the pan with water. Heat the larger pan with water to a boil. Remove both the pans from the burner. Be careful hot steam comes out! Set aside on your stove top or heat resistant counter top or cutting board.
Melt the food grade wax and chocolate chips inside of your Double Boiler, which ever one you have.
Stir with a wooden spoon until all of the wax and chocolate are melted completely.

Roll each ball gently into the chocolate wax mixture using a tooth pick. Take the chocolate ball out using the same tooth pick. The wax makes a nice shine on the chocolate and you can't taste it.

Put the chocolate ball onto the baking sheet lined with wax paper. Don't worry about the pinhole that the tooth pick made, you can fill that in later with the melted chocolate or later turn the chocolate ball upside down once it sets up. You will never see it. Shhhhh....our little secret (wink wink)
Set the chocolate balls, AKA: Buckeyes back into the refrigerator on the wax paper lined baking tray to set up and cool. Take them out in about an hour to serve. I like to put them in decorative cookie tins to give as gifts. I line the bottom of the cookie tin with a fancy paper doily and gently place them in one at a time. I also put them into decorative paper liners-cups. You can stack them gently on top of each other. I have used a decorative paper plate over the bottom layer of Buckeyes, then place more of them on top of this plate. Put the cookie tin lid on tightly. Keep refrigerated for best results.


Done with white Chocolate and decorative sprinkles.

Ingredients:
*1-Pound, 16-Ounces of Confectioners Sugar AKA: Powdered Sugar (3 1/2-Cups)*
*1-Pkg Graham Crackers (3-Cups)*
*2-Sticks Butter Softened (1-Cup)*
*1-Teaspoon Pure Vanilla Extract*
*1-Cup Peanut Butter*
Ingredients to be used in the last step:
1-12 Oz bag of good quality Chocolate Chips
1/2 Bar of Food Grade Wax
What You Will Need:
Mixing bowl
Double-Boiler or use 2-Pans one smaller than the other
Small Ice Cream Scoop or a Tablespoon
Two baking sheets. One for the refrigerator and one for putting the finished Buckeyes on.
Tooth Picks
Wax Paper
Parchment Paper
Crush the Graham Crackers turning them in to crumbs. I find putting them in to a Ziplock plastic bag, closing the bag, laying the bag on a flat work surface, then using a rolling pin over the closed bag repeatedly works well. Make sure there are no large pieces. They should look like grains of sand. A food processor works well too. I have used both.
Blend all of the above 5-ingredients with the * into a mixing bowl. You can do this by hand with a wooden spoon or with a stand mixer. I use my KitchenAid for everything, I love it. Use the Paddle Attachment. Mix well.

Take the Peanut Butter mixture and roll into 1-inch balls. I use a small Ice Cream Scoop, this makes all of the balls the same size. If you don't have one, just use a Tablespoon to scoop out the mixture.
After you roll each ball, put it on the Parchment lined baking sheet. Repeat this process until there is no more mixture left inside of the bowl. How many balls you get depends on if you use a scoop or tablespoon. Put the baking sheet with your balls in to the refrigerator over night.

After the balls have set up over night in the refrigerator, take them out and put on a flat work surface.
*How to make a Double-Boiler*
Place the larger pan on your stove top. Fill the pan halfway with water. Take the smaller pan and put on top of the pan with water. Heat the larger pan with water to a boil. Remove both the pans from the burner. Be careful hot steam comes out! Set aside on your stove top or heat resistant counter top or cutting board.
Melt the food grade wax and chocolate chips inside of your Double Boiler, which ever one you have.
Stir with a wooden spoon until all of the wax and chocolate are melted completely.

Roll each ball gently into the chocolate wax mixture using a tooth pick. Take the chocolate ball out using the same tooth pick. The wax makes a nice shine on the chocolate and you can't taste it.

Put the chocolate ball onto the baking sheet lined with wax paper. Don't worry about the pinhole that the tooth pick made, you can fill that in later with the melted chocolate or later turn the chocolate ball upside down once it sets up. You will never see it. Shhhhh....our little secret (wink wink)
Set the chocolate balls, AKA: Buckeyes back into the refrigerator on the wax paper lined baking tray to set up and cool. Take them out in about an hour to serve. I like to put them in decorative cookie tins to give as gifts. I line the bottom of the cookie tin with a fancy paper doily and gently place them in one at a time. I also put them into decorative paper liners-cups. You can stack them gently on top of each other. I have used a decorative paper plate over the bottom layer of Buckeyes, then place more of them on top of this plate. Put the cookie tin lid on tightly. Keep refrigerated for best results.


Done with white Chocolate and decorative sprinkles.
My Baked Apples
Ingredients:
3-Tablespoons Cold Butter Sliced
6-Medium Apples *I like Granny Smith's or Macintosh for this recipe*
1-Teaspoon Cinnamon Ground, extra for sprinkling *Optional*
3/4-Cup Packed Brown Sugar
What You Will Need:
Buttered Casserole Dish.
Apple Slicer or Knife
Measuring Cup
Measuring Spoon
Wooden Spoon
Oven Mitts
Paper Towels or Kitchen Towel
Pre-heat your oven to 350-degrees.
Directions:
Wash all of your apples thoroughly then dry. Now Cut and core all of them. I use a Corer-slicer it's so much faster than using a knife. Once all are cored, peel the skins off of each apple.

Put the apples in to the buttered casserole dish. Add the packed brown sugar and cinnamon, combine well, give it a few gentle tosses with the wooden spoon. Now add the sliced butter on top of the apples, scatter it around.

Put the casserole dish in to your pre-heated oven and bake for about 60-minutes or until the apples are a golden brown color and fork tender. I like to check mine half-way through and take them out of the oven and give them another gentle toss to make sure all of the apples are thoroughly coated with the butter, cinnamon and brown sugar mixture. I also give a small sprinkling of cinnamon on the top, but it's not necessary. You should have a nice golden syrup once the apples are finished baking. Once out of the oven, let them set on top of your stove, cutting board or counter top, if your counters are safe to do so. If not, put an oven pad or mitt under the hot casserole dish. Let cool for a little bit 10-minutes is good. Use caution they are extremely hot!! Serve as a side dish or dessert.
Monday, January 4, 2016
Hasselback Potatoes
These are extremely easy and basically idiot proof. They also are delicious.
Pre-heat your oven to 450-Degrees
Ingredients:
6-Medium potatoes -scrubbed and washed
Salt and Pepper to taste
1/3-Cups Chopped Chives, dry is fine if you don't have fresh
1/2-Cup Extra Virgin Olive Oil
8-Tablespoons Butter melted
1/2 Tsp Granulated Garlic *Optional*
What You Will Need:
Large baking sheet lined with Aluminum Foil
Medium bowl
Sharp Knife
Pasty Brush or Spoon for drizzling
Directions:
In a bowl, stir in butter, olive oil, chives, garlic, salt and pepper. Set aside.


Served with Sour Cream, Baked Ham Steak with Brown Sugar Mustard Glaze, Baked Apples and Green Sweet Peas.
Pre-heat your oven to 450-Degrees
Ingredients:
6-Medium potatoes -scrubbed and washed
Salt and Pepper to taste
1/3-Cups Chopped Chives, dry is fine if you don't have fresh
1/2-Cup Extra Virgin Olive Oil
8-Tablespoons Butter melted
1/2 Tsp Granulated Garlic *Optional*
What You Will Need:
Large baking sheet lined with Aluminum Foil
Medium bowl
Sharp Knife
Pasty Brush or Spoon for drizzling
Directions:
In a bowl, stir in butter, olive oil, chives, garlic, salt and pepper. Set aside.

Take a cleaned potato and place it on a solid work surface. Make slices on the potato crosswise with a sharp knife, don't go all the way through. Leave about a 1/4-inch un-sliced at each end of the potato. Repeat process with the remaining 5-potatoes. When all of the potatoes have been sliced, put them
on the lined baking sheet. Brush on the olive oil - butter mixture in between each of the slices.

Bake potatoes for about an hour or fork tender with a crispy skin. The potatoes should fan out. Enjoy!

Served with Sour Cream, Baked Ham Steak with Brown Sugar Mustard Glaze, Baked Apples and Green Sweet Peas.
Wednesday, December 16, 2015
French Toast
This has to be one of the easiest breakfasts to make and my family loves it.
What You Will Need:
Measuring Cup
Measuring Spoon
Frying Pan
Medium Size Bowl
Whisk
Spatula
Ingredients:
4-Pieces of thick white bread
2-Eggs, cracked and beaten into a large bowl
3/4 Cup of whole milk
1-Teaspoon Ground Cinnamon
1 1/2 Teaspoon Sugar
1-Tablespoon Butter
Real Maple Syrup
Extra butter for French Toast
Directions:
Set your stove top for Medium heat. Add butter to your frying pan and melt the butter. Whisk-beat your two cracked eggs in a medium bowl. Be careful not to get shells in the eggs. Add the rest of the above ingredients to the whisked-beaten eggs. Submerge one piece of bread into the egg mixture, make sure to coat completely. Turn the bread over and repeat. Put this egg coated bread in to the hot frying pan. Repeat the same steps with the other 3-pieces of bread.


What You Will Need:
Measuring Cup
Measuring Spoon
Frying Pan
Medium Size Bowl
Whisk
Spatula
Ingredients:
4-Pieces of thick white bread
2-Eggs, cracked and beaten into a large bowl
3/4 Cup of whole milk
1-Teaspoon Ground Cinnamon
1 1/2 Teaspoon Sugar
1-Tablespoon Butter
Real Maple Syrup
Extra butter for French Toast
Directions:
Set your stove top for Medium heat. Add butter to your frying pan and melt the butter. Whisk-beat your two cracked eggs in a medium bowl. Be careful not to get shells in the eggs. Add the rest of the above ingredients to the whisked-beaten eggs. Submerge one piece of bread into the egg mixture, make sure to coat completely. Turn the bread over and repeat. Put this egg coated bread in to the hot frying pan. Repeat the same steps with the other 3-pieces of bread.


Cook each egg dipped piece of bread for about 7-9 minutes or until golden brown, once golden brown flip each of them over until they are also golden brown. Put on plates and serve with butter and maple syrup. I like peanut butter on mine instead of butter. You should try it, it's really good. Served with apple slices and bacon. Enjoy!


 |
| Butter |
 |
| Peanut Butter |
Monday, December 7, 2015
Cast Iron Skillet Jalepeno Cornbread
Here is another recipe that friends and family have requested. I pair this with my home made New England Clam Chowder.
Time start to finish, about an hour.
Ingredients:
1/2 cup (1 stick) Butter, melted, plus more for greasing skillet
1/2 cup Light Brown Sugar
2-large Eggs
2-Cups Yellow Cornmeal
1-Cup All-Purpose Flour
1 Teaspoon Baking Soda
Pinch of Salt
Pinch of White Sugar you can use Brown Sugar if you like
1-Cup Whole Buttermilk
1-Cup Sour Cream
1/2-Cup diced Jalapeno Peppers. If you don't want this to be really hot and spicey, remove the seeds and membraines.
1/2 Cup chopped Scallions or Yellow Onions, either work fine.
4-strips of cooked Bacon
2-Tablespoons of Bacon Grease
Note: I will re-season my Cast Iron Skillet and then pull it out of the oven. Let the Skillet cool. I then take soften Butter and rub it along the sides of the Skillet and melt a little Butter on the bottom of the Skillet to coat, about a Tablespoon or so.
Cooking the Bacon:
This is the easiest way to cook Bacon and the least amount of mess, which I try to avoid.
Put your Bacon on an Aluminum Foil lined baking sheet. Don't stretch and pull, just line the strips side-by-side. Put the baking sheet in a cold oven and turn on to 400-degrees. Bake roughly for about 20-minutes or until golden brown. When done, remove the bacon and put it on a plate that is lined with paper towels to absorb the grease. Reseve the grease for gravies, stews etc.,.
Whisk together the melted Butter and Brown Sugar in a large mixing bowl. Add the Eggs and whisk until combined. Add the Cornmeal, Flour, Baking Soda, Salt and Brown Sugar and whisk to combine. Add the Buttermilk and Sour Cream and whisk together. Add the Jalapenos, Scallions and reserved Bacon Grease. Break up your cooked Bacon and add to the mixture. Use a spatula to stir until just combined. Pour the batter in to your lightly greased Cast Iron Skillet. Bake until a toothpick inserted in the center comes out clean, about 30-Minutes. Lightly Sprinkle the top with Light Brown Sugar or White Sugar. Let cool for about 15-minutes, this helps firm up the Cornbread so it doesn't crumble and break apart. If you don't care about this, then eat it pipping hot, both ways still taste delicious. You can also drizzle warm Pure Maple Syrup over the top as well. We eat it this way for breakfast.

Time start to finish, about an hour.
Ingredients:
1/2 cup (1 stick) Butter, melted, plus more for greasing skillet
1/2 cup Light Brown Sugar
2-large Eggs
2-Cups Yellow Cornmeal
1-Cup All-Purpose Flour
1 Teaspoon Baking Soda
Pinch of Salt
Pinch of White Sugar you can use Brown Sugar if you like
1-Cup Whole Buttermilk
1-Cup Sour Cream
1/2-Cup diced Jalapeno Peppers. If you don't want this to be really hot and spicey, remove the seeds and membraines.
1/2 Cup chopped Scallions or Yellow Onions, either work fine.
4-strips of cooked Bacon
2-Tablespoons of Bacon Grease
Note: I will re-season my Cast Iron Skillet and then pull it out of the oven. Let the Skillet cool. I then take soften Butter and rub it along the sides of the Skillet and melt a little Butter on the bottom of the Skillet to coat, about a Tablespoon or so.
Cooking the Bacon:
This is the easiest way to cook Bacon and the least amount of mess, which I try to avoid.
Put your Bacon on an Aluminum Foil lined baking sheet. Don't stretch and pull, just line the strips side-by-side. Put the baking sheet in a cold oven and turn on to 400-degrees. Bake roughly for about 20-minutes or until golden brown. When done, remove the bacon and put it on a plate that is lined with paper towels to absorb the grease. Reseve the grease for gravies, stews etc.,.
Whisk together the melted Butter and Brown Sugar in a large mixing bowl. Add the Eggs and whisk until combined. Add the Cornmeal, Flour, Baking Soda, Salt and Brown Sugar and whisk to combine. Add the Buttermilk and Sour Cream and whisk together. Add the Jalapenos, Scallions and reserved Bacon Grease. Break up your cooked Bacon and add to the mixture. Use a spatula to stir until just combined. Pour the batter in to your lightly greased Cast Iron Skillet. Bake until a toothpick inserted in the center comes out clean, about 30-Minutes. Lightly Sprinkle the top with Light Brown Sugar or White Sugar. Let cool for about 15-minutes, this helps firm up the Cornbread so it doesn't crumble and break apart. If you don't care about this, then eat it pipping hot, both ways still taste delicious. You can also drizzle warm Pure Maple Syrup over the top as well. We eat it this way for breakfast.
Stuffed Peppers With Rice and Ground Beef
I find that using orange or yellow peppers tend to be sweeter and I like the color. You can us whatever color peppers you prefer, ie,. green, red, yellow or orange. They all taste good in the end.
8-Servings
Preheat your oven on 400-degrees
What You Will Need:
Baking Sheet
Parchment Paper
Baking Sheet
Medium Size Pot
Oven Mitts
Knife
Measuring Spoons
Measuring Cup
Wooden Spoon
Large Spoon
Large Bowl
Ingredients:
8-Large Bell Peppers
3-Cups cooked rice (White, Jasmine, Brown or Wild) you choose.
1-Egg well beaten
1/4 Pound lean ground beef
3-Garlic Cloves peeled and pressed
1-Onion peeled and finely chopped
1/2 Cup of Crackers or bread crumbs.
2-Teaspoons of salt
1/2 Tsp black ground pepper
Dash of Cayenne Pepper *Optional*
2-Teaspoons Basil
2-Teaspoons Parsley
2-Teaspoons Oregano
2-Tablespoons Worcestershire Sauce
1-Pint of spaghetti sauce. *I make mine homemade but you can use jar sauce that's fine*
You can leave out any of the spices and herbs if you don't like them. I like using fresh but dried is fine. You can also increase or decrease the amount for your own taste. I tend to actually add a bit more spices and herbs than I had listed here.
Directions:
Cook your rice first as instructed on the box. Once cooked, set aside and cool. Mix your cooked rice, egg, ground beef, crumbs, spices and herbs thoroughly. I use my hands, you can use a wooden spoon.


Wash your peppers and then dry. Using a paring knife, cut around the stem in a circle and then remove stem. Scrape the inside of the pepper and remove the seeds and thick flesh, discard all. (Stem, seeds and thick flesh)

Fill each pepper with the meat and rice mixture and place on the parchment paper lined baking sheet. Pour the spaghetti sauce over top of the peppers and around the bottom with a large spoon.
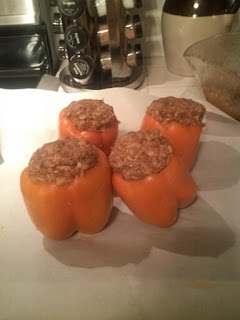
Bake peppers covered loosely with aluminum foil for 15-minutes at 400-degrees. After the 15-minutes, remove the foil and reduce your oven temperature to 325-degrees. Cook the peppers until fork tender which is about an hour depending on your oven. Serve on plates and add the remainder of the spaghetti sauce on top of each pepper. I served mine with mashed turnips and a mixed green salad on the side. Enjoy!


8-Servings
Preheat your oven on 400-degrees
What You Will Need:
Baking Sheet
Parchment Paper
Baking Sheet
Medium Size Pot
Oven Mitts
Knife
Measuring Spoons
Measuring Cup
Wooden Spoon
Large Spoon
Large Bowl
Ingredients:
8-Large Bell Peppers
3-Cups cooked rice (White, Jasmine, Brown or Wild) you choose.
1-Egg well beaten
1/4 Pound lean ground beef
3-Garlic Cloves peeled and pressed
1-Onion peeled and finely chopped
1/2 Cup of Crackers or bread crumbs.
2-Teaspoons of salt
1/2 Tsp black ground pepper
Dash of Cayenne Pepper *Optional*
2-Teaspoons Basil
2-Teaspoons Parsley
2-Teaspoons Oregano
2-Tablespoons Worcestershire Sauce
1-Pint of spaghetti sauce. *I make mine homemade but you can use jar sauce that's fine*
You can leave out any of the spices and herbs if you don't like them. I like using fresh but dried is fine. You can also increase or decrease the amount for your own taste. I tend to actually add a bit more spices and herbs than I had listed here.
Directions:
Cook your rice first as instructed on the box. Once cooked, set aside and cool. Mix your cooked rice, egg, ground beef, crumbs, spices and herbs thoroughly. I use my hands, you can use a wooden spoon.


Wash your peppers and then dry. Using a paring knife, cut around the stem in a circle and then remove stem. Scrape the inside of the pepper and remove the seeds and thick flesh, discard all. (Stem, seeds and thick flesh)

Fill each pepper with the meat and rice mixture and place on the parchment paper lined baking sheet. Pour the spaghetti sauce over top of the peppers and around the bottom with a large spoon.

Bake peppers covered loosely with aluminum foil for 15-minutes at 400-degrees. After the 15-minutes, remove the foil and reduce your oven temperature to 325-degrees. Cook the peppers until fork tender which is about an hour depending on your oven. Serve on plates and add the remainder of the spaghetti sauce on top of each pepper. I served mine with mashed turnips and a mixed green salad on the side. Enjoy!


Subscribe to:
Posts (Atom)